The complete walkthrough — first-time setup, building your product catalog, drawing an estimate on the map, and sending a quote your customer can sign and pay online. New here? Watch this first, then dig into the full guide below.
Visual Fence Pro User Guide
Complete step-by-step guide to using Visual Fence Pro. Learn how to create estimates, send quotes, collect payments, and grow your fence business.
Visual Fence Pro is a complete business management system built specifically for fence contractors. It combines satellite mapping, material calculations, professional quoting, payment collection, and integrations with QuickBooks and Google Calendar — all in one platform.
What You Can Do
Create estimates in minutes — Search any address, trace fence lines on satellite maps, get instant material breakdowns
Send professional quotes — Branded PDF quotes emailed directly to customers with your logo and company info
Collect payments online — Customers can e-sign and pay deposits right from the quote page (via Stripe)
Auto-calculate materials — Smart BOM engine calculates boards, posts, rails, concrete, fasteners, and gates based on industry specs
Sync with QuickBooks — Automatically create customers, estimates, and invoices in QuickBooks
Schedule installations — Work orders auto-add to Google Calendar with address and details
Access building codes — Searchable database of fence height limits and setback requirements by jurisdiction
Generate photo mockups — AI visualizer creates realistic fence renders on customer properties
💡 Tip: This guide covers everything in the exact order you should set up your account. Follow it step-by-step for the smoothest experience.
Your First Steps
Here's what you'll do to get fully set up (takes about 15 minutes):
Set up your company profile — Add your business name, phone, address, and logo
Add your fence products — Set up the fence styles you install with your pricing per foot
Connect Stripe — Link your bank account so customers can pay deposits online
Create your first estimate — Search an address, draw fence lines, see the magic happen
Send a quote — Email a professional quote to a customer with e-signature and payment
After that, you can optionally connect QuickBooks and Google Calendar to automate even more of your workflow.
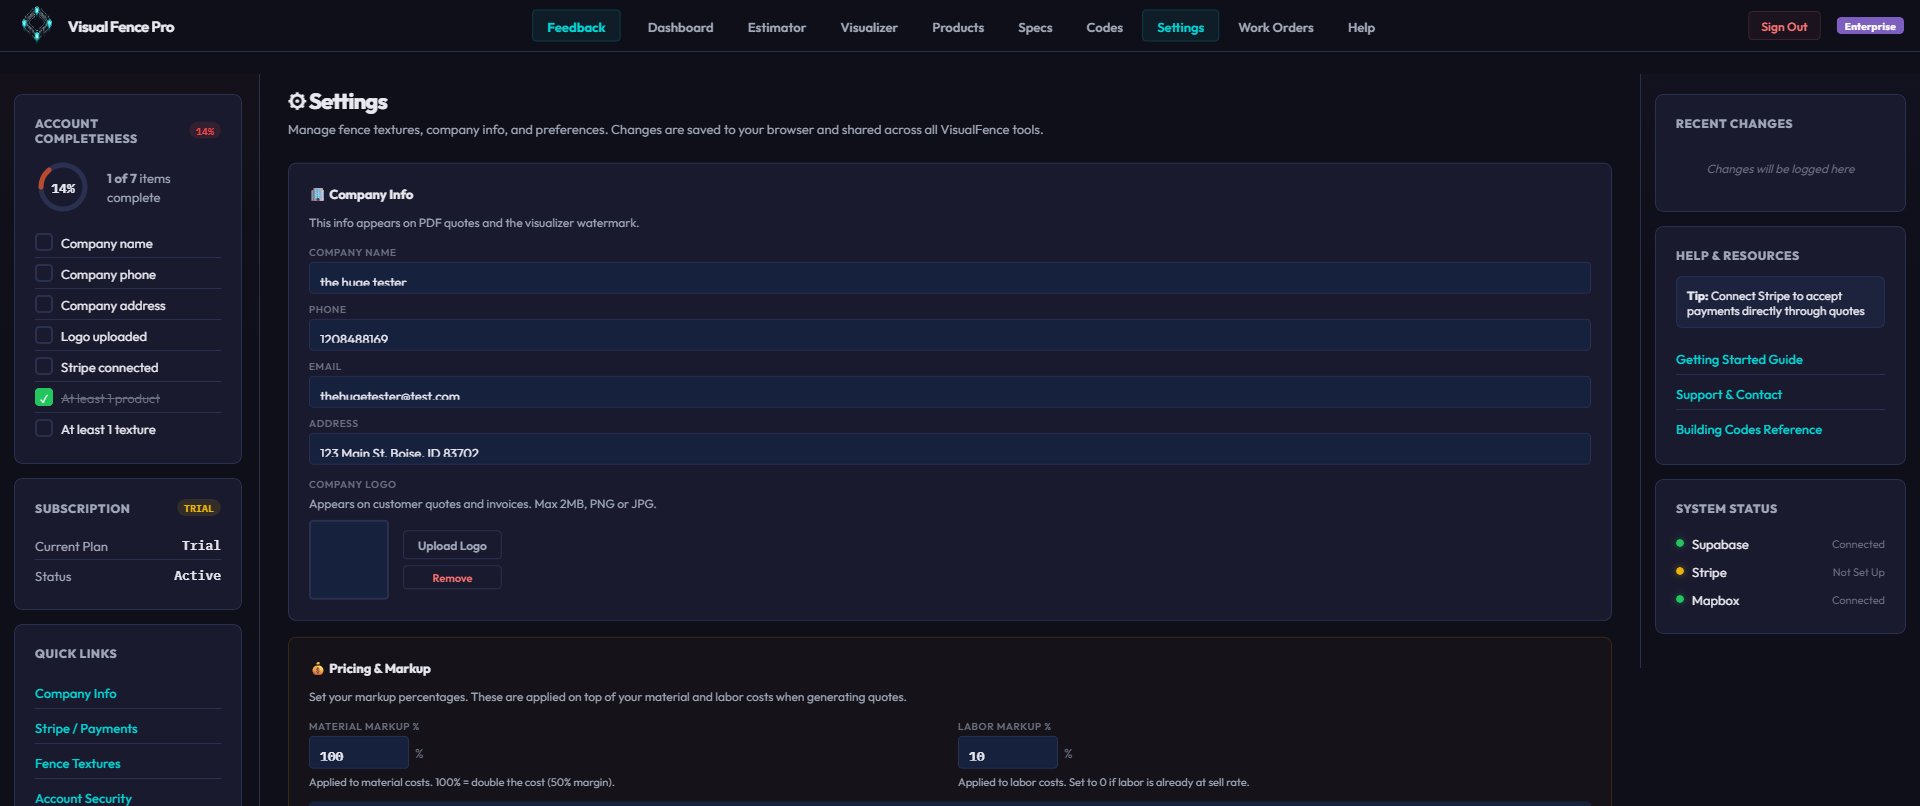
2. Setting Up Your Company Profile
Your company information appears on every quote, invoice, and email you send to customers. Setting this up correctly is critical — it's the first thing your customers see.
What You'll Add
Company Name — Your business name exactly as you want it to appear on quotes
Phone Number — Primary business phone (appears on quotes and invoices)
Email Address — Business email for customer-facing documents (can be different from your login email)
Street Address — Full business address including city, state, and ZIP
Company Logo — Your logo image (appears on quotes, invoices, and visualizer watermarks)
Step-by-Step Instructions
Click Settings in the top navigation bar
Scroll to the "Company Information" section (it's the first section on the page)
Fill in your company name exactly as you want it to appear on customer documents
Enter your phone number (format doesn't matter — it auto-formats to (123) 456-7890)
Enter your business email — this is what customers see on quotes. If you want to use a professional email like info@yourcompany.com instead of your personal login email, add it here
Enter your full business address including street, city, state, and ZIP code
Click "Upload Logo" and select your company logo image (PNG or JPG, max 2MB)
Click "Save Company Info" at the bottom of the Company Information section
💡 Pro Tip: Use a square logo (1:1 aspect ratio) for best results. It will appear on the top-left of your quotes and as a watermark on visualizer mockups.
ℹ️ Business Email vs. Login Email: Your login email is for signing into Visual Fence Pro. Your business email is what customers see on quotes. Many contractors use a personal Gmail for login but display a professional business email to customers.
Sales Tax (Canadian contractors)
If your company's country is set to Canada, a Sales Tax card appears in Settings (US accounts never see it). Fence installation is a service to real property, so a GST/HST-registered contractor charges tax on the full job:
Tick "I'm registered and charge sales tax on quotes", pick your province, and the correct tax label and rate fill in automatically (e.g. Ontario → HST 13%). You can edit them.
Enter your GST/HST registration number — it prints on every quote and PDF so your customer can claim their input tax credit (required by the CRA).
Quotes then show Subtotal → tax → Total, and the deposit is calculated on the tax-inclusive total.
BC & Manitoba: you charge the customer GST only — provincial sales tax is paid on your materials at the supplier, not added as a line. Saskatchewan & Quebec (two-tax provinces) are coming soon.
ℹ️ Not registered? Small suppliers under $30,000/yr in taxable sales aren't required to register and must not charge tax — just leave the toggle off. When in doubt, confirm your situation with your accountant.
3. Understanding Products vs Specs
Visual Fence Pro uses a two-layer system for fence data. Understanding the difference between Products and Specs is key to using the platform effectively.
What are Specs?
Specs (short for specifications) are the industry-standard construction details for each fence style. This includes:
Board dimensions — Actual width and count per panel (e.g., wood privacy uses 17-18× 1x6 boards at 5.5" actual width for an 8' panel)
Post sizes — Line posts and corner posts (e.g., 4x4 line, 4x4 corners)
Rails — Number and size of horizontal support rails
Concrete — Bags per post and hole depth by fence height
Fasteners — Screws/nails per connection point
Panel width — Standard spacing between posts (usually 8 feet)
The Specs database contains 69 fence styles across 5 categories:
Wood — 25 styles (dog ear, flat top, cap & trim, board on board, shadowbox, T&G, horizontal, louver, picket, split rail, post & rail, concave/convex top, etc.)
Coming soon: Railings (aluminum, cable, glass, wood, iron) and Staircases & Spiral Staircases — these are built in the BOM/engineering engine with full specs and are rolling out to the estimator soon.
ℹ️ Why Specs Matter: Specs power the BOM (Bill of Materials) engine. When you draw a fence line and select a style, the BOM engine uses the spec data to calculate exactly how many boards, posts, rails, bags of concrete, and fasteners you need for that specific run.
🏭 Manufacturer & Grade (Ornamental Iron/Steel): When you create or edit an ornamental product, you can pick the actual manufacturer and grade you install — Ameristar Montage (Residential or Plus/Commercial), Jerith (Liberty/Legacy or Premier), or Ultra Aluminum (Residential or Commercial). Picking one sets the correct panel length automatically (steel Montage runs 8' panels; most aluminum lines run 6' — this directly changes your material and labor counts), and your customer's quote then includes that manufacturer's real specification card, drawn from the maker's own product manuals. No manufacturer picked = no spec card on the quote, so nothing generic ever reaches your customer.
What are Products?
Products are YOUR custom fence offerings with YOUR pricing. When you create a product, you:
Choose a fence category and style (which links to a spec)
Set YOUR price per linear foot
Add any height options you offer (4', 5', 6', 8', etc.)
Optionally customize material markup % and labor markup %
Products live in the Products page and are what you select when creating estimates.
How They Work Together
Example: Creating a Wood Dog Ear Privacy Product
▼
You go to Products and click "Add Product"
You select Category: Wood and Style: Dog Ear Privacy
Behind the scenes, this links to the spec for Wood Dog Ear Privacy, which defines:
17-18 boards per 8-foot panel (1x6 boards, 5.5" actual width)
4x4 line posts, 4x4 corner posts
2-4 rails (2x4) depending on height — 2 for 4', 3 for 5-7', 4 for 8'
1.5 bags of concrete per line post, 2 bags for corners
Hole depth: 24" for 4-5' fence, 30" for 6' fence, 36" for 8' fence
You set YOUR price: $28 per linear foot
You add height options: 6' and 8'
Now when you create an estimate and draw a 100-foot fence line, the BOM engine uses the spec to calculate materials and uses YOUR $28/ft pricing to calculate the total cost
💡 Pro Tip: Want to offer 3-rail wood fences? In your Product's component details, just add another rail line item — the BOM engine will use whatever components you've defined. You can customize rail counts, board counts, or any other component to match how you actually build.
💡 Key Takeaway: Specs = construction details (maintained by Visual Fence Pro). Products = your pricing (created by you). When you create an estimate, you select a Product, and the spec data auto-calculates the materials.
4. Adding Your First Product
Now that you understand the difference between products and specs, let's add your first fence product. You'll need at least one product before you can create estimates.
Two Ways to Price Each Fence
Before you set a price, decide how you want to price each fence style. Visual Fence Pro gives you two methods, and you can use a different one for each style — many contractors mix them (a flat rate for chain link, cost-based for custom cedar on the same job).
My advertised rate — simple. You enter the price you advertise, like $55 per foot installed, for that fence style. That's the number on the quote — done. Gates and tear-out are added on top. ⚠ The trade: the app won't know what materials cost you, so it can't show your profit on these jobs. You'll still get the full materials list for ordering.
My costs + markup — detailed. You enter what your supplier charges you, then your markup % and labor (set in Settings) get added on top to build the customer's price. Takes more setup. ✓ The payoff: every bid also shows your cost and your profit, so you can see the margin on every job.
ℹ️ Where you set it: The company-wide default lives in Settings → Pricing (the “How do you price your fences?” card) and seeds every new style you create. You can override it per style on the Products page. Changing the default never touches styles you’ve already set up — they keep their current method.
💡 When to use each: If you already quote by a flat installed rate and don’t want to track supplier costs, pick advertised rate — it’s the fastest path to a quote. If you want the app to show your margin and profit on every job, pick costs + markup and enter your real material costs.
Before You Start
Have this information ready:
Fence style you want to offer (e.g., Wood Dog Ear Privacy, Vinyl Solid Privacy, Chain Link Standard)
Your price per linear foot for that style
Heights you offer (4', 5', 6', 8', etc.)
💡 Pricing Guidance: Not sure what to charge? Check the Specs page to see material breakdowns for each style. A common formula: (Material cost per foot × 2.0) + $8-12/ft labor = price per foot. Example: $6 materials × 2.0 + $10 labor = $22/ft.
Step-by-Step: Adding a Product
Click Products in the top navigation bar
Click the "+ Add Product" button (bottom-right corner or top of the page)
In the Category dropdown, select your fence category (Wood, Vinyl, Iron/Aluminum, or Chain Link)
In the Style dropdown, select the specific style (e.g., "Dog Ear Privacy" for wood)
Enter a custom name for this product (optional — defaults to the style name). Example: "Premium Cedar Privacy 6ft"
At the top of the pricing card, choose your pricing method — My advertised rate (the price you charge, installed) or My costs + markup (your supplier cost, with markup and labor added on top). See Two Ways to Price Each Fence above.
Set your Price Per Foot — under advertised rate this is what you charge the customer per linear foot; under costs + markup it's what your supplier charges you per foot
Check the Height Options you offer (4', 5', 6', 8', etc.) — you can select multiple
(Optional) Adjust Material Markup % and Labor Markup % if you want to fine-tune pricing
(Optional) Scroll to the "Gate Pricing" section and set your prices: one flat price for walk gates (covers all 3-5ft widths), and separate prices for 10ft and 12ft double drive gates. See Section 9: Adding Gates for details
Click "Save Product"
📸
Screenshot: Products page with "Add Product" modal showing category/style selection
Understanding the Product Card
After saving, your product appears as a card on the Products page. Each card shows:
Spec details — Board count, post sizes, bags of concrete per post (pulled from the linked spec)
Height options you offer
Edit and Delete buttons
ℹ️ How Many Products Should I Add? Start with your 2-3 most popular styles. You can always add more later. Most contractors have 5-10 products covering their main offerings.
Editing and Managing Products
To edit a product, click the Edit button on its card. You can change:
To delete a product, click Delete and confirm. Warning: Deleting a product doesn't affect existing estimates that use it, but you won't be able to create new estimates with that product.
5. Exploring the Specs Database
The Specs page is your reference library for all fence construction details. You don't need to create or edit specs — they're pre-loaded with industry-standard data. But browsing them helps you understand exactly what the BOM engine is calculating.
What You'll Find on the Specs Page
Click Specs in the top navigation bar
You'll see a category filter bar at the top: All, Wood, Vinyl, Ornamental Iron/Steel, Chain Link
Click any category to filter the specs to that category
Each spec is displayed as a card showing:
Category badge and style name
SVG thumbnail showing the fence profile
Key stats: Board count per panel, post sizes, bags of concrete per post
"View Details" button to see the full spec breakdown
Viewing Full Spec Details
Click "View Details" on any spec card to see the complete breakdown:
Boards/Pickets/Mesh — Count per panel, dimensions, actual width
Rails — Count and size (e.g., 2× 2x4 rails)
Posts — Line post size and corner post size (e.g., 4x4 line, 4x4 corner)
Footing — Bags of concrete per line post, per corner post, per gate post, and hole depth by fence height
Fasteners — Screws/nails per board-to-rail connection, per rail-to-post connection
Panel Width — Standard spacing between posts (usually 8 feet, 10 feet for chain link)
Notes — Special considerations (e.g., "Dog ear boards have 45° clipped corners", "Privacy slats sold separately")
💡 Use Case: If a customer asks "How many boards are in an 8-foot section of dog ear privacy fence?" — you can answer instantly by checking the spec (answer: 17-18 boards).
Printing Specs
Click the "Print Spec Sheet" button (top-right when viewing a spec) to generate a printer-friendly version. Useful for:
Training new crew members
Keeping in your truck for quick reference
Showing customers the construction quality/materials
ℹ️ Can I Edit Specs? Not directly — specs are maintained by Visual Fence Pro to ensure accuracy. However, if you notice an error or want a custom spec for a unique style you offer, email sean@visualfencepro.com and we can add it to the database.
6. Creating Your First Estimate
This is where Visual Fence Pro really shines. You'll search any address, trace fence lines on a satellite map, and get an instant material breakdown. The whole process takes 2-5 minutes per job.
Before You Start
Make sure you have:
✅ At least one product added (see section 4)
✅ A property address to estimate (can be your own house for practice)
The Estimator Workflow
The estimator guides you as you go: a cyan chip at the top of the sidebar always shows your next step (1. find the property → 2. pick fence runs → 3. add the customer → 4. send the quote), and the ❓ How it works button in the Property card replays the 4-step walkthrough anytime. Here's the big-picture flow. We'll break down each step in detail below:
Search for the property address
The satellite map loads and (usually) auto-detects the property boundary
Click on the map to draw fence line points
Select a fence product and height
The BOM engine calculates materials, labor, and total cost in real-time
Add gates if needed
Save the project
Step-by-Step: Creating an Estimate
Click Estimator in the top navigation bar
You'll see a search bar at the top-left: "Search property address..."
Type the property address (street, city, state) and press Enter or click the magnifying glass
The map flies to that location and zooms in. If parcel data is available, you'll see a cyan boundary around the property
If you see a boundary, you can click "Auto-Trace Boundary" to automatically draw along the entire property line (you can edit it after)
Or, manually draw fence lines by clicking points on the map where you want fence posts. Each click places a post, and a cyan line connects them
Continue clicking to add posts. The footage updates in real-time in the sidebar
When you're done with a fence run, click anywhere off the fence line to finish that segment
The sidebar shows the segment. Click it to select a Product and Height
Once you select a product, the BOM breakdown appears instantly below the segment
📸
Screenshot: Estimator showing satellite map with property boundary and fence line drawn
💡 Pro Tip: Hold Shift while drawing to disable angle snapping. By default, the map snaps to 0°, 45°, and 90° angles to make straight fences easier.
What If There's No Parcel Boundary?
In rural areas or new subdivisions, parcel data might not be available. You'll see a message: "📍 No parcel data here yet."
Click the "📐 Draw Manually" button to:
Draw fence lines freehand without a property boundary
Optionally draw a custom property boundary polygon
The satellite map is powered by Mapbox, the same technology used by companies like Airbnb, Snapchat, and The Weather Channel. It provides high-resolution aerial imagery for the entire United States.
Map Controls
Zoom — Mouse wheel, or +/− buttons (top-right corner)
Pan — Click and drag the map
Rotate — Right-click and drag, or Ctrl + drag (on Mac: Cmd + drag)
Reset North — Click the compass icon (top-right) to reset rotation to north-up
What the Colors Mean
Cyan boundary — Property boundary (parcel data)
Cyan line — Fence line you're drawing or have drawn
Cyan dots — Fence posts (each click = one post)
Orange dot — The selected/active post (you can drag it to move)
Green icon — Gate location
Editing Fence Lines
After drawing a fence line, you can edit it:
Click any post (cyan dot) to select it — it turns orange
Drag the selected post to move it
Delete a post by clicking it and pressing Delete or Backspace
Add a post mid-segment by clicking on the fence line between two existing posts
⚠️ Measurement Accuracy: Visual Fence Pro uses satellite imagery and geodetic calculations for measurements. Accuracy is typically within ±2-3% for straight runs. Always verify critical dimensions on-site before ordering materials.
There are two ways to draw fence lines: Manual (click-by-click) and Auto-Trace. Most contractors use a combination of both.
Method 1: Manual Click-by-Click
This gives you full control and is best for complex layouts or when you only want to fence part of the property.
Click on the map where you want the first fence post
Click where you want the second post — a cyan line connects them, showing the footage
Keep clicking to add more posts. The fence line extends with each click
When you're done with that fence run, click anywhere off the fence line to finish the segment
The segment appears in the sidebar as "Run 1" or "Front Side" (you can rename it)
To start a new fence run (e.g., backyard after finishing front yard), just click a new starting point on the map
💡 Angle Snapping: By default, fence lines snap to 0°, 45°, and 90° angles within 5° tolerance. This makes it easy to draw straight fences. Hold Shift to disable snapping for angled or curved property lines.
Method 2: Auto-Trace Boundary
If parcel data is available, you can auto-trace the entire property boundary with one click:
After searching an address, if you see a cyan property boundary, click the "Auto-Trace Boundary" button (sidebar, below the address)
Visual Fence Pro automatically converts the boundary into fence segments, breaking it at corners and property line changes
Each side appears as a separate segment in the sidebar (Front, Back, Left, Right, etc.)
You can now select each segment and assign a fence product + height
If you don't want to fence the entire boundary, delete unwanted segments by clicking them and pressing Delete
ℹ️ Auto-Trace Accuracy: Auto-trace uses the parcel boundary data from county GIS systems. It's highly accurate for property lines, but remember that fences are typically installed 1-2 feet inside the property line (not directly on it) to avoid encroachment. Adjust the traced line inward if needed.
📏 Footage rounds up: Each fence run shows and quotes a clean whole-foot length, always rounded up — a 29′4″ side reads 30′, a 22′7″ side reads 23′. You can’t build a partial foot, so any remainder bumps to the next whole foot for material.
Combining Both Methods
The most common workflow:
Use Auto-Trace to quickly draw the full perimeter
Delete segments you don't need (e.g., front yard if customer only wants backyard)
Manually adjust posts by dragging them to match obstacles (trees, utility boxes, etc.)
Manually add segments for gates or internal fence runs
Snap to Building Footprints
When you're drawing fence lines near a house, garage, or other structure, the editor automatically snaps your cursor to the corners of buildings on the property. You'll see a cyan target indicator when the snap engages — this guarantees the fence terminates exactly where the structure begins, no eyeball estimation.
Building footprints are sourced from Microsoft's Open Building Footprints dataset (152 million US + Canadian buildings). Coverage is strongest in metro areas and continues to improve as we expand region tiles.
💡 When the snap fires: Get within ~6 ft (zoomed in) of a building corner. The cursor "locks" to the corner with a brief cyan flash. Click to place the post at that exact corner. To draw freely without snapping, just keep moving — the snap releases as soon as the cursor leaves the corner radius.
If the building under your cursor isn't in the footprints dataset (rural properties, very new construction), the snap simply doesn't engage and you draw freehand like before. No state to toggle; it's always on when applicable.
9. Adding Gates (Walk & Double Drive)
Gates are added directly to fence segments. Visual Fence Pro keeps gate pricing simple: set your prices per product with just 3 fields.
Gate Types
Visual Fence Pro supports two categories of gates:
Walk Gate — Single-swing pedestrian gate. Customer picks their preferred width (3ft, 4ft, or 5ft) but pricing is the same flat rate regardless of width or height.
Double Drive Gate — 12ft — Two-panel gate for larger vehicles and trailers
Anything beyond these standard sizes should be handled as a custom quote outside the system.
How Gate Pricing Works
Gate pricing is set per product on the Products page. Each fence style has its own gate prices — because a wood walk gate costs very differently from an iron walk gate.
There are just 3 price fields per product:
Walk Gate — One flat price for all walk gates (3-5ft wide, any height)
Double Drive 10ft — Price for 10ft double drive gates
Double Drive 12ft — Price for 12ft double drive gates
Setting Gate Prices
Go to Products in the top nav
Click Edit on the product you want to configure
Scroll to the "Gate Pricing" section (below component details)
Enter your prices for walk gates, 10ft double drive, and 12ft double drive
Click "Save Product"
💡 Pro Tip: Gate prices for wood fences are typically much lower than iron gates. Setting per-product prices means your wood dog ear estimate uses $285 for a walk gate while your ornamental iron estimate uses $450 — automatically, no manual adjustment needed.
Step-by-Step: Adding a Gate to an Estimate
Draw your fence line and select a product/height (see sections 6-8)
In the sidebar, find the segment where you want to add a gate
Click the "+ Add Gate" button below that segment's BOM breakdown
A dropdown appears. Select your gate type:
Walk Gate (3ft, 4ft, or 5ft)
Double Drive Gate (10ft or 12ft)
The gate is added to the segment and priced automatically based on your product's gate prices
The BOM updates to include the gate price and adjusts post/concrete calculations
📸
Screenshot: Sidebar showing fence segment with "Add Gate" button and gate type dropdown
Multiple Gates on One Segment
You can add multiple gates to the same fence run. Common use case: 4ft walk gate + 12ft double drive gate on a long backyard run.
Click "+ Add Gate" again
Select a different gate type
Both gates appear in the BOM breakdown with individual prices
Removing a Gate
To remove a gate:
Find the gate in the segment's BOM breakdown (it's listed under "Gates")
Click the red X or Delete button next to the gate
The gate is removed and the BOM recalculates
💡 Gate Posts: Gates use the same post type as the fence line (not upgraded to larger posts). Visual Fence Pro calculates concrete at 1 bag per gate post regardless of fence height. If you prefer upgraded gate posts (e.g., 6x6 instead of 4x4), note it in the project description for your crew.
Gate footage deduction → Settings → Gate Settings (toggle whether gate width is subtracted from total fence footage)
Each product has its own gate prices. Walk gates are one flat price regardless of width (3-5ft) or fence height. Double drive gates are priced individually (10ft and 12ft).
9.5. Adding Upgrades to a Span
Instead of keeping a separate fence style for every variation, you add upgrades right on each span — each with its own price. Every selected span shows an Upgrades section with the options that fit that fence:
Cap & Trim (per foot) — on privacy wood styles. The price is suggested from your own catalog costs; adjust it if you want.
3rd Rail (per foot) — on wood privacy spans up to 5' tall. A 5' fence now builds with 2 rails by default; check this to add the third where your customer or HOA wants it. You set the price, and the extra rail rides your order list automatically.
PostMaster Cover Pickets (per post) — only appears when the product uses PostMaster steel posts. You set the price.
Heavy-Duty Hinge & Latch (per gate) — only when the span has a gate.
Privacy Slats / Windscreen (per foot) — on chain link.
+ Custom — add anything else: name it, choose per-foot / per-post / per-gate / flat, and set your price.
Check an upgrade, set its price, and it recalculates instantly. Prices you haven’t set yet show an amber reminder and are left out of the total until you enter one — we never invent a price for you. Use ⊞ All to copy an upgrade (and its price) to every other span it fits. On the customer’s quote, upgrades appear as their own clear line items — the price you set is the price they see, with no markup added on top.
10. Understanding the BOM (Bill of Materials) Breakdown
The BOM (Bill of Materials) is the heart of Visual Fence Pro. It auto-calculates exactly what you need to install the fence based on the spec data for the selected fence style.
What's in the BOM?
For each fence segment, the BOM shows:
Footage — Linear feet of fence
Panels — Number of 8-foot (or 10-foot for chain link) sections
Boards/Pickets/Mesh — Total count (e.g., 130 boards for a 100-foot wood privacy fence)
Rails — Total horizontal support rails (e.g., 39 rails for 13 panels × 3 rails/panel at 6ft height)
Line Posts — Number of standard posts along the fence run
Corner Posts — Number of corner/end posts (if the segment has corners or endpoints)
Gate Posts — Number of posts for gates (calculated from gate count)
Concrete — Total bags (e.g., "34 bags (60-lb)" for line posts + corners + gates)
Fasteners — Total screws or nails needed
Gates — List of gates added to this segment with prices
Material Cost — Raw material cost before markup
Labor Markup — Labor calculated as a percentage markup on material costs (set in Settings)
Total Cost — Grand total for this fence segment (material + labor markup + gates)
How the BOM Engine Works
Example Calculation: 100ft Wood Dog Ear Privacy Fence, 6' Height
▼
Input:
Fence length: 100 feet
Product: Wood Dog Ear Privacy, $28/ft
Height: 6 feet
Spec Data (from Wood Dog Ear Privacy spec):
Panel width: 8 feet
Boards per panel: 17-18 (1x6 boards, 5.5" actual width)
Rails per panel: 3 at 6' height (2x4 rails)
Line post: 4x4
Corner post: 4x4
Concrete: 1.5 bags per line post, 2 bags per corner post
Fasteners: 2 screws per board-to-rail connection
BOM Engine Calculates:
Panels: 100 ft ÷ 8 ft/panel = 12.5 panels (rounds up to 13)
Boards: 13 panels × 18 boards/panel = 234 boards
Rails: 13 panels × 3 rails/panel = 39 rails
Line Posts: 13 panels = 13 posts (one per panel) + 1 terminal post = 14 total
Corner Posts: Depends on the shape — straight run = 0 corners, L-shape = 1 corner, etc.
Concrete: 14 line posts × 1.5 bags = 21 bags, plus 2 bags per corner post
Material Cost: Calculated based on your material markup % setting
Labor Markup: Material cost × your labor markup % (set in Settings)
Total: Material + Labor Markup + Gates
Result: ~$2,800 total for the 100-foot fence (at $28/ft)
Viewing the Full Quote BOM
To see the combined BOM for all fence segments in a project:
Scroll to the bottom of the sidebar (below all segments)
You'll see "Project Totals" with:
Total linear feet across all runs
Combined material breakdown
Total material cost
Total labor markup
Grand total for the entire project
ℹ️ Concrete Depth: Concrete hole depth varies by fence height. Example for wood privacy: 4-5' fence = 24" deep, 6' fence = 30" deep, 8' fence = 36" deep. This is noted in the spec but doesn't affect bag count — Visual Fence Pro calculates bags per post regardless of depth.
Spec Notes
Some fence styles have special notes that appear below the BOM. Examples:
Dog Ear: "Dog ear boards feature 45° clipped corners at the top, not a pointed peak"
Chain Link: "Privacy slats sold separately. Add 250 slats per 100 linear feet."
Shadowbox: "Requires double-sided board installation with alternating pattern"
These notes help you quote accurately and educate customers on what's included.
11. Saving & Managing Projects
Once you've created an estimate, you'll want to save it so you can come back to it later, send quotes, create work orders, and track progress.
Saving Your First Project
After drawing fence lines and selecting products/heights, scroll to the bottom of the sidebar
Click the "Save Project" button (bright cyan button at the bottom)
A modal appears asking for project details:
Project Name — Required. Use a descriptive name like "Smith Backyard Fence" or "123 Main St - Privacy Fence"
Customer Name — Optional but recommended. First and last name of the property owner
Customer Phone — Optional. Contact number for the customer
Customer Email — Optional. You'll need this later if you want to send quotes via email
Notes — Optional. Internal notes about the project (e.g., "Gate opens inward", "Tear-out old chain link first")
Click "Save"
The project is saved and you'll see a success message. The project now appears on your Dashboard
💡 Naming Convention: Use a consistent naming format to make projects easy to find. Popular formats: "LastName - Address" (Smith - 123 Main St) or "Address - FenceType" (456 Oak Ave - Privacy Fence).
Project Statuses
Projects automatically track their status based on your actions:
Draft — Just saved, no quote sent yet
Quoted — Quote has been emailed to the customer
Signed — Customer has e-signed the quote
Paid (Deposit) — Customer has paid the deposit
In Progress — Work order created, installation scheduled
Completed — Final invoice sent and paid
Viewing Saved Projects
All your projects live on the Dashboard:
Click Dashboard in the top nav
Scroll to the "Recent Projects" section
You'll see all your projects in a table with columns: Project Name, Customer, Status, Date Created, Total
Click any row to open that project in the Estimator
Editing a Saved Project
Open the project from your Dashboard (click the row)
The Estimator loads with your saved fence lines, products, and BOM
Make any changes:
Add/remove fence segments by drawing on the map
Change products or heights in the sidebar
Add/remove gates
Update customer info
Click "Save Project" again to save your changes
The updated project replaces the old version (no duplicate created)
Deleting a Project
⚠️ Warning: Deleting a project is permanent and cannot be undone. Make sure you really want to delete before confirming.
Go to your Dashboard
Find the project in the Recent Projects table
Click the trash icon (🗑️) in the Actions column
A confirmation dialog appears
Click "Delete" to confirm
The project is permanently deleted from your account
Searching and Filtering Projects
On the Dashboard, you can:
Search by name — Type in the search bar above the projects table to filter by project name or customer name
Filter by status — Click the status filter dropdown to show only Draft, Quoted, Signed, In Progress, or Completed projects
Sort by date — Click the "Date Created" column header to sort newest-first or oldest-first
Sort by total — Click the "Total" column header to sort by project value (helpful for prioritizing high-value jobs)
12. Sending Quotes to Customers
Once you've saved a project, you can send a professional, branded quote directly to your customer's email. They'll receive a link to view the quote online, e-sign, and pay a deposit.
Every quote includes a clean layout drawing. Your customer sees a professional architectural drawing of the job — real property lines, the house footprint, gates with swing arcs, and each span labeled with its footage, all drawn to scale. Preview it any time before sending with the 📐 Preview Layout Drawing button in the estimator. If you’d also like the customer to see the actual satellite photo with your fence lines on it (below the drawing), turn on Satellite Photo on Quotes in Settings — it’s off by default.
Before You Send a Quote
Make sure you have:
✅ Completed company setup (name, logo, phone, address)
✅ Saved the project with customer email address
✅ Connected Stripe (optional, but required for deposit collection)
Step-by-Step: Sending a Quote
Open the project you want to quote (from Dashboard or while in the Estimator)
In the sidebar, scroll to the bottom and click the "Share Quote" button
A quote preview modal opens showing:
Your company logo and info
Customer name and address
Itemized fence breakdown (each segment with footage, product, height, total)
Material breakdown (boards, posts, concrete, gates)
Subtotal, taxes (if applicable), and grand total
Review the quote for accuracy. If you need to make changes, click "Cancel" and edit the project first
If the customer email is missing or incorrect, update it in the "Customer Email" field
Click "Send Quote via Email"
Visual Fence Pro generates a secure quote link and emails it to the customer
You'll see a success message: "Quote sent to [email]"
The project status updates to "Quoted" on your Dashboard
📸
Screenshot: Quote preview modal showing company logo, fence breakdown, and "Send Quote" button
What the Customer Receives
Your customer gets an email with:
Subject line: "Quote from [Your Company Name] - [Project Name]"
Email body: Professional message with your company logo, brief intro, and a big "View Quote" button
Quote link: Secure unique URL (like visualfencepro.com/quote?token=abc123) that only they can access
What the Customer Sees on the Quote Page
When the customer clicks "View Quote", they see a branded page with:
Your company branding — Logo, name, phone, email, address
Project details — Property address, quote date, quote number
Fence breakdown — Each fence run with style, height, footage, and subtotal
Material list — Detailed BOM showing boards, posts, rails, concrete, fasteners, gates
E-Signature section — Customer can type their name and click "Sign" to accept the quote
Pay Deposit button — (If Stripe connected) Customer can pay the deposit via credit card
ℹ️ Quote Expiration: Quotes don't expire by default. If you want to set an expiration, include the terms in your project notes or mention it in the email to your customer.
E-Signature Workflow
When a customer signs your quote:
They type their name in the signature field
Click "I Accept This Quote"
The signature is saved with a timestamp, the signer’s IP address, and a locked record of the exact quote and terms they agreed to (legally binding)
The quote page updates to show "Signed by [Name] on [Date]"
You receive an email notification: "Quote signed: [Project Name]"
The project status on your Dashboard updates to "Signed"
📄 Add your own Contract Terms: In Settings → Company Info, fill in the Contract Terms box with your standard terms or disclaimer. They appear on every quote you send, right above the customer’s signature (and on the PDF), so the customer agrees to them when they sign — and the exact terms are locked into the signed record. Leave it blank and quotes stay exactly as before.
Tracking Quote Status
To see if a customer has viewed or signed your quote:
Go to your Dashboard
Check the Status column:
Quoted — Sent but not yet viewed or signed
Signed — Customer has e-signed
Paid (Deposit) — Customer has signed AND paid the deposit
Click the project row to view full details and quote activity log
Resending a Quote
If the customer lost the email or needs the link again:
Open the project
Click "Share Quote" again
Click "Resend Quote Email"
The same quote link is emailed again (it's the same URL, not a new quote)
12.5. Customers — CRM & Bid Scheduling
The Customers page (the Customers link in the top navigation) is one place for everything about every customer: all their jobs and quotes, where each one stands, your message history with them, your private notes — and now the front end of every job: log a caller in seconds and put their bid visit on the calendar before you hang up. It builds itself — every estimate you save, quote you send, and lead that comes in is added automatically.
What's on the page
Customer list — searchable by name, email, phone, or address, sorted with your most recent activity on top, with a stage badge on each customer and revenue collected per customer at a glance
Pipeline stages — every pursuit moves Lead → Contacted → Scheduled → Estimated → Quoted → Won automatically: a new lead starts at Lead, booking a bid visit moves it to Scheduled, marking the visit done moves it to Estimated, sending the quote moves it to Quoted, and a signature marks it Won. Use the stage chips above the list to filter, or move a customer by hand with the stage dropdown on their deal.
Views — switch between Customers (the list), Sent Quotes (every outstanding quote across all customers on one board — Sent, Viewed, Signed, Paid at a glance), and Bids (your upcoming bid-visit agenda)
Unread messages — a badge on any customer who's written back and is waiting on a reply, plus a "needs reply" filter so nobody slips
Jobs & quotes — each job with its quote's real timeline (Sent → Viewed → Signed → Paid), dollars collected, the fence type/footage/price per job, and buttons to View Quote (open the signed quote) or Open in Estimator (edit it) right from the job
Messages — the same two-way Customer Hub thread you know from Work Orders, right on the customer
Notes — dated, private notes only you and your team can see ("gate code 4482", "call back in spring")
Adding a customer by hand (phone intake)
Someone calls the shop wanting a quote? Click + Add Customer at the top of the list and type their name plus at least one way to reach them — an email or a phone. An email is how their booking confirmation and reminder emails reach them, but it isn't required: a phone-only customer is fine, and so is putting your own email on the record (it's saved as a send-to address so those emails still reach you). Add their address and a quick note ("corner lot, wants privacy, has a dog") if you have them. They land in your list at the Lead stage, ready to schedule. Whoever answers the phone can do this — no estimating knowledge needed.
Scheduling a bid visit
Open the customer and click + Schedule bid (in their Bid visits section)
Pick the date and time window, confirm the address, add an optional note for yourself
Click Save — the appointment is booked and the customer's stage moves to Scheduled automatically
When you book it, three things happen on their own:
Google Calendar — if your calendar is connected (section 16), the visit lands on it instantly as its own event
Confirmation email — the customer immediately gets a branded "your estimate is scheduled" email with the date, time, and address. Replies go straight to your business email, so "can we do Thursday instead?" reaches you, not a no-reply box.
Reminder emails — the customer automatically gets a reminder about two days before and again the day before, with prep tips: clear the fence line of bushes and anything leaning on it, secure pets, have the gate code handy. Fewer wasted trips.
The Bids agenda
The Bids view is your bid-visit schedule — every upcoming visit with the customer, time window, and address. After a visit, hit Mark done and the customer's stage moves to Estimated — your cue that they're waiting on a quote.
💡 Nobody goes cold. If a lead sits for 3+ days with no bid visit on the calendar, the Customers page shows a "leads waiting" banner with the count — click Show me to see exactly who's waiting. Book their bid or move their stage and they drop off. The fastest shops get a bid on the calendar before the lead cools off.
Where customers come from
Four sources feed the page automatically: your estimates (anyone you quote), your website's estimator widget (leads land at the Lead stage, and the homeowner gets an instant "we got your request" email so they know you're on it), PermitPulse (when you mark a permit lead contacted, it becomes a customer you can track), and phone intake (the + Add Customer button above). Your existing customers are already loaded from your past projects — nothing to import.
ℹ️ Repeat customers are one record. A customer with three jobs over two years shows as one person with three deals, so their whole history stays together. They're matched by name together with their contact details — and because an email is treated as a way to reach someone rather than as their identity, putting your own email on a customer's quote, or two people sharing one inbox, never merges different customers into each other.
13. Connecting Stripe for Payments
Stripe is the payment processor that lets customers pay deposits and final invoices directly from your quotes. It's the same platform used by Amazon, Lyft, and millions of businesses worldwide.
Why Connect Stripe?
Get paid faster — Customers pay online with a credit card, funds hit your bank in 2 business days
No more checks — No trips to the bank, no bounced checks, no waiting for mail
Professional experience — Customers see a modern, secure payment page (not a third-party like PayPal)
Automatic tracking — Payments sync to your Dashboard and QuickBooks automatically
No monthly fees — Stripe charges 2.9% + 30¢ per transaction. No setup fees, no monthly fees from Visual Fence Pro
Step-by-Step: Connecting Stripe
Go to Settings
Scroll to the "Billing & Payments" section
Click the "Connect your Stripe account" button
You'll be redirected to Stripe's secure page
If you already have a Stripe account, sign in and authorize Visual Fence Pro — your money lands in the same Stripe dashboard you already log into
If you don't have a Stripe account yet, you can create one right there during the connection, then provide:
Business name
Business type (LLC, sole proprietor, corporation, etc.)
Tax ID (EIN or SSN)
Bank account info (for payouts)
Personal info (for identity verification)
Stripe verifies your info (usually instant, sometimes takes 1-2 business days)
Once approved, you're redirected back to Visual Fence Pro Settings
You'll see a green "Connected" badge next to Stripe
💡 Bank Account: Use a business checking account if you have one. Stripe can also pay out to personal accounts, but business accounts keep your finances cleaner for tax time.
Setting Your Deposit
You choose the deposit on each quote as you send it, so you can match it to the job. In the Send Quote window, under Deposit, you have two options:
% of total — collect a percentage of the quote. The default is 50%; type any number you want (for example 25, 33, or 100).
= my materials cost — collect exactly your materials cost upfront, so the customer covers the materials before you order them. The balance is billed when the job is done.
A live line shows "Customer pays $X now" as you adjust it. Leave it on 50% and quotes behave exactly as they always have.
Customer opens your quote link (from the email you sent)
They review the quote and e-sign if they accept
Below the signature section, they see a "Pay Deposit" button showing the amount (e.g., "Pay $2,500 Deposit")
They click the button and are redirected to a secure Stripe payment page
They enter their credit card info (Visa, Mastercard, Amex, Discover)
They click "Pay"
Stripe processes the payment and redirects them back to the quote page showing "Payment Successful"
You receive an email notification: "Deposit received: $2,500 for [Project Name]"
The project status updates to "Paid (Deposit)"
Funds appear in your Stripe dashboard immediately and transfer to your bank in 2 business days
ℹ️ Stripe Fees: Stripe charges 2.9% + 30¢ per transaction. On a $2,500 deposit, the fee is $72.80, so you net $2,427.20. Fees are deducted automatically before payout. Visual Fence Pro does not take any additional fees.
Tracking Payments
To see all payments:
In Visual Fence Pro: Go to Dashboard → Recent Projects. The "Paid" column shows deposit status.
In Stripe: Log into your Stripe Dashboard to see full transaction history, payouts, and customer details
Sending Final Invoices
After completing the job, you can send a final invoice for the remaining balance:
Open the project
Click "Send Final Invoice" (in the sidebar)
Enter the amount due (auto-calculated as Total - Deposit Paid)
Click "Send"
Customer receives an email with a link to pay the balance via Stripe
Once paid, the project status updates to "Completed"
Disconnecting Stripe
To disconnect Stripe (not recommended unless switching accounts):
Go to Settings → Billing & Payments
Click "Disconnect Stripe"
Confirm the disconnection
Existing quotes still work, but new quotes won't have payment buttons until you reconnect
14. Creating Work Orders
Work orders are printable job sheets you give to your crew. They include the customer's address, fence details, material list, installation notes, and a map showing the fence layout.
When to Create Work Orders
Create a work order after:
Customer signs the quote
Deposit is paid (if using Stripe)
You've scheduled the installation date
Materials have been ordered
Step-by-Step: Creating a Work Order
Go to Work Orders in the top nav
Click "+ Create Work Order"
Select the project from the dropdown (only shows projects with status "Signed" or "Paid")
Fill in work order details:
Installation Date — When your crew will install the fence
Crew Assignment — Which crew or team members are assigned (optional)
Start Time — What time the crew should arrive (optional)
Crew Notes — Special instructions (e.g., "Gate opens inward", "Avoid sprinkler line on west side")
Click "Create Work Order"
The work order is saved and appears in the Work Orders list
What's on a Work Order?
Work orders include:
Header — Your company logo and name
Customer Info — Name, address, phone
Job Details — Installation date, crew assignment, start time
Fence Breakdown — Each fence run with style, height, footage
Material List — Complete BOM:
Boards/pickets with count and dimensions
Rails with count and size
Line posts, corner posts, gate posts with sizes
Concrete bags with depth specs
Fasteners
Gates with types and widths
Crew Notes — Your special instructions
Signature Section — Customer sign-off that work is complete
Printing Work Orders
In the Work Orders list, find your work order
Click the "Print" button (🖨️ icon)
A print-friendly version opens in a new tab
Click Print in your browser (or press Ctrl+P / Cmd+P)
Select your printer and print
💡 Pro Tip: Print two copies — one for your crew, one for the customer to sign when the job is done.
Google Calendar Integration
If you've connected Google Calendar (see section 16), work orders automatically add installation appointments to your calendar when created. The event includes:
Location: Customer's address (clickable for driving directions)
Description: Project details, crew assignment, and a link back to Visual Fence Pro
Editing Work Orders
To change the date, crew, or notes:
Go to Work Orders
Find the work order and click "Edit"
Update the fields
Click "Save Changes"
If Google Calendar is connected, the calendar event updates automatically
Completing Work Orders — the Closeout Wizard
When the install is done, click the green Complete Job button on the work order. Instead of a single click that flips status to Completed, the app walks you through a 3-step Closeout Wizard that captures the things contractors actually need before invoicing the balance.
Step 1 — Photo proof of the finished install
Upload at least one photo of the completed work (a long-shot of the fence line is usually enough). The wizard won't advance until at least one photo is attached. Photos go straight into the work-order record, attached to the customer's project and visible in the customer's final invoice email.
💡 Why it's mandatory: Photo proof is the single best dispute-prevention tool. When a customer questions the work months later ("the gate hinges look wrong"), you've already got dated photos of the as-built condition. The wizard makes this habit automatic.
Step 2 — Balance reconciliation
Confirm the remaining balance owed by the customer. The wizard pre-fills the amount from the original quote minus any deposit already collected, but you can override it for change orders, tip-outs, or adjustments. This is the number that goes on the final invoice — get it right here and the rest of the flow handles itself.
Step 3 — Customer email + send
Compose the final-invoice email the customer will see. The default copy thanks them, links to the secure final-invoice page (where they can pay the balance via Stripe), and attaches the photo from Step 1. Edit the subject or body if you want a personal note. Click Send Final Invoice and the email goes out via the same durable email system as your shared quotes.
After Step 3, the work-order status flips to Completed, the project is marked done, and the customer receives the final-invoice email. If they pay online, your Stripe Connect account receives the funds; if they pay offline, you can manually mark the invoice paid from the work-order detail screen.
ℹ️ Can I still complete without the wizard? Not from the main Complete Job button — the wizard is the single path so photo proof stays consistent. But if you've already collected payment off-platform and just need to close the record, use the Mark as Paid + Closed override on the work-order detail page (advanced action, audit-logged).
14.5. Customer Hub — Let Customers Track Their Job
The Customer Hub is a branded web page your customer opens to follow their fence project from quote to finished — in real time, on any device. It cuts down on "where's my fence?" calls and makes you look buttoned-up. Each customer gets their own private link, branded with your company name and logo.
What the customer sees
Progress timeline — each stage from quote approved → crew dispatched → installed → complete, updating as you advance the work order
Job-site photos — grouped into Before / In Progress / Finished as your crew uploads them to the work order
Their property map — the satellite image with their fence line drawn on it
Quote & invoice — review, e-sign, and pay (deposit or balance) straight from the hub
Two-way messaging — they can message you, and your replies appear for them instantly
Install-day weather for their scheduled date
How the customer gets it
Nothing extra to do — the hub link is automatically included in the quote email and the final-invoice email you already send. The customer taps "Open Your Project Hub" and they're in. The same link works for the whole job, so they can bookmark it and check back anytime.
Copying a link yourself
Open a job in Work Orders
Click 🌐 Customer Hub Link
The link is copied to your clipboard — paste it into a text or email to the customer
The link is tied to the customer's email, so all of that customer's jobs with you show up in one place.
Messaging your customer
Open a job in Work Orders and scroll to the Customer Messages panel to read and reply. Your customer sees the reply in their hub, and they automatically get a short email as the job advances through major stages (crew dispatched, in fabrication, installation, complete).
Turning the hub on or off
The Customer Hub is on by default. If you don't use work orders or simply don't want it, go to Settings → Customer Hub and switch it off — customers won't receive hub links and the hub tools stay hidden in your account.
ℹ️ Note: The "Pay" buttons in the hub only work once you've connected Stripe (see Section 13). Without Stripe, customers can still review and e-sign their quote — they just pay you offline as usual.
15. QuickBooks Integration
Connect QuickBooks to automatically sync customers, estimates, invoices, and payments between Visual Fence Pro and your accounting software. This saves hours of manual data entry and keeps your books accurate.
What Syncs to QuickBooks?
Customers — When you save a project with customer info, that customer is auto-created in QuickBooks
Estimates — When you send a quote, an estimate is created in QuickBooks with line items matching your fence breakdown
Invoices — When you send a final invoice, an invoice is created in QuickBooks
Payments — When a customer pays via Stripe, the payment is recorded in QuickBooks against the invoice
Step-by-Step: Connecting QuickBooks
Go to Settings
Scroll to the "QuickBooks" section
Click "Connect QuickBooks"
You'll be redirected to Intuit's login page
Sign in with your QuickBooks account credentials
Intuit asks you to authorize Visual Fence Pro. Review the permissions and click "Authorize"
You're redirected back to Visual Fence Pro Settings
You'll see a green "Connected" badge with your QuickBooks company name
ℹ️ QuickBooks Online Only: Visual Fence Pro integrates with QuickBooks Online, not QuickBooks Desktop. If you use Desktop, you'll need to migrate to Online or manually export/import data.
How Auto-Sync Works
QuickBooks sync happens automatically when you:
Save a project with customer info → Customer is created in QB
Send a quote → Estimate is created in QB with line items
Send a final invoice → Invoice is created in QB
Receive a Stripe payment → Payment is recorded in QB against the invoice
You don't need to do anything — it's all automatic. Visual Fence Pro checks every hour for new activity and syncs in the background.
Manual Sync
To force a sync right now (useful after connecting QB for the first time):
Go to Settings → QuickBooks
Click "Sync Now"
Visual Fence Pro syncs all pending items
You'll see a success message showing how many items were synced
Viewing Sync Status
To see what's been synced:
Go to Settings → QuickBooks
Scroll to "Sync Activity"
You'll see a log of recent syncs with timestamps and status (Success, Failed, Pending)
Troubleshooting Sync Issues
If a sync fails, common causes are:
Duplicate customer — QuickBooks already has a customer with that email. Visual Fence Pro will link to the existing customer instead of creating a duplicate
Missing required fields — QuickBooks requires certain fields (like customer name). Make sure your project has complete customer info
QB connection expired — QuickBooks tokens expire every 180 days. Re-authorize by disconnecting and reconnecting QB in Settings
⚠️ Don't Edit in Both Places: If you edit a customer or estimate in QuickBooks after it's been synced, those changes won't sync back to Visual Fence Pro. Visual Fence Pro is the "source of truth" — always make edits here, not in QB.
Disconnecting QuickBooks
To disconnect QuickBooks:
Go to Settings → QuickBooks
Click "Disconnect QuickBooks"
Confirm the disconnection
Existing synced data in QB remains (it's not deleted), but new items won't sync until you reconnect
16. Google Calendar Integration
Connect Google Calendar to automatically add installation appointments to your calendar when you create work orders. No more double-entry — create a work order in Visual Fence Pro, and it instantly appears on your Google Calendar.
Why Connect Google Calendar?
One calendar, one source of truth — All your installations in one place
Mobile access — View your schedule on your phone with the Google Calendar app
Crew scheduling — Share your calendar with crew members so they know where to go
Driving directions — Click the event location to get turn-by-turn directions in Google Maps
Automatic reminders — Google Calendar sends you notifications before each appointment
Step-by-Step: Connecting Google Calendar
Go to Settings
Scroll to the "Google Calendar" section
Click "Connect Google Calendar"
You'll be redirected to Google's sign-in page
Sign in with your Google account (use the Gmail account you want to sync the calendar to)
Google asks you to grant Visual Fence Pro permission to:
View your calendars
Create and edit events
Click "Allow"
You're redirected back to Visual Fence Pro Settings
Select which calendar to use from the dropdown (Default: your primary calendar)
Click "Save"
You'll see a green "Connected" badge
💡 Pro Tip: If you have multiple Google calendars (personal, work, crew schedule), create a dedicated "Fence Installations" calendar and select it during setup. This keeps fence jobs separate from your personal events.
How Auto-Calendar Works
When you create a work order in Visual Fence Pro:
Visual Fence Pro creates a Google Calendar event with:
Title: "[Customer Name] - Fence Installation"
Date & Time: From the work order
Location: Customer's address (clickable for directions)
Description: Project details, fence style, crew assignment, link to the work order in Visual Fence Pro
The event appears on your Google Calendar instantly
If you edit the work order (change date, time, or crew), the calendar event updates automatically
If you delete the work order, the calendar event is deleted too
Viewing Your Schedule
To see your installation schedule:
In Google Calendar: Open calendar.google.com or the Google Calendar mobile app
In Visual Fence Pro: Go to Work Orders → click "Calendar View" to see a month/week view of all installations
Editing Events
Important: Always edit work orders in Visual Fence Pro, not in Google Calendar. If you edit the event directly in Google Calendar, those changes won't sync back to Visual Fence Pro, and you'll lose sync.
Disconnecting Google Calendar
To disconnect:
Go to Settings → Google Calendar
Click "Disconnect Google Calendar"
Confirm the disconnection
Existing events remain on your calendar (not deleted), but new work orders won't create calendar events until you reconnect
17. Building Codes Database
The Building Codes page is a searchable database of fence regulations for cities and counties across the United States. Use it to quickly look up height limits, setback requirements, and permit rules.
What's in the Database?
For each jurisdiction, you'll find:
Maximum fence height — Front yard vs. side/rear yard limits
Setback requirements — How far the fence must be from the property line, sidewalk, or street
Permit requirements — Whether a building permit is required and how to apply
Special rules — Pool fencing, corner lot visibility triangles, HOA regulations, historic districts
Contact info — Building department phone and website
Searching for Building Codes
Click Building Codes in the top nav
Use the search bar to search by:
City name (e.g., "Boise")
County name (e.g., "Ada County")
State (e.g., "Idaho" — shows all jurisdictions in that state)
ZIP code (e.g., "83702")
Results appear as cards below the search bar
Click a card to expand and see the full details
Understanding Height Limits
Most jurisdictions have different height limits for front yards vs. side/rear yards:
Front yard: Typically 3-4 feet (shorter to avoid blocking driver visibility)
Side/Rear yard: Typically 6-8 feet (taller for privacy)
Example: Boise, ID allows 4' fences in front yards and 8' fences in side/rear yards.
⚠️ Always Verify: Building codes change frequently. This database is updated regularly, but always call the local building department to confirm before quoting or installing. Visual Fence Pro is not liable for code violations.
Setback Requirements
Setback = how far the fence must be from the property line. Common setbacks:
0 feet (on property line) — Allowed in most areas if you own both sides or have neighbor consent
6 inches to 2 feet — Common for side/rear yards to allow maintenance access
5-15 feet from street — Required in some cities for front yard fences
Permit Requirements
Some jurisdictions require building permits for fences. The database shows:
No permit required — You can install without approval (common for fences under 6')
Permit required — You must apply for a permit before installation
HOA approval required — In addition to (or instead of) a building permit, you need HOA sign-off
Adding Codes to Quotes
When creating a quote, you can reference building codes to educate customers:
Look up the customer's city in the Building Codes database
Note the height limit for their yard type (front/side/rear)
In your project notes, add: "Per [City] code, maximum fence height in rear yard is 8 feet"
This shows professionalism and helps set customer expectations
ℹ️ Coverage: The database currently covers 500+ cities across all 50 states, with a focus on major metro areas. If you need a code that's not listed, email sean@visualfencepro.com and we'll research and add it.
18. Visualizers — AI Photo Mockups + 3D Build Preview
Two ways to show a customer what they're buying before you hand them a quote: AI Visualizer (photorealistic render of the fence on their property photo) and 3D Build Visualizer (interactive 3D model of the engineering-accurate construction). Both are live; both ship inside the customer's shared quote so the customer doesn't have to log in or install anything.
A. AI Visualizer (photorealistic property mockup)
Upload a photo of the customer's yard, draw a fence line, pick a style and a color (vinyl colors for vinyl, stain colors for wood), and the AI renders a photorealistic preview in 20–30 seconds. Daily limits by plan: Free 2/day · Starter 10/day · Pro 25/day · Enterprise 25/day (rolling 24h window per company).
Click Visualizer in the top nav, or jump from any shared quote's preview link
Upload a photo of the customer's property (JPEG or PNG, landscape orientation works best)
Trace the desired fence line on the photo
Pick a style and a color (Wood Dog Ear Cedar Privacy in 7 stain colors, plus Vinyl Solid Privacy in 5 colors)
Click Generate — 20–30 seconds and you have a render
💡 Wood stain colors: Show the homeowner their wood fence in any of 7 stains — Natural, Pecan, Mahogany, Dark Walnut, Burnt Hickory, weathered Driftwood Gray, or solid Matte Black — the same way you'd swap vinyl colors. Pick a color and the fence re-renders in that finish. Vinyl Solid Privacy comes in White/Tan/Clay/Gray/Black. Boards-in vs Boards-out (which side faces the customer's yard) is selectable for wood. Heights 3ft–8ft. Photorealistic shadows + lighting baked in.
ℹ️ Best photos for the AI: daytime light, clear view of where the fence will go, full area visible (don't crop), no cars or people blocking the line. Photos that meet these criteria typically render correctly on the first try.
B. 3D Build Visualizer (engineering-accurate build preview)
While the AI Visualizer shows the finished look, the 3D Build Visualizer shows the construction — every post, panel, cap, rail, and bracket placed exactly where it'll be in the customer's yard. The customer drags to rotate, scrubs through the build layer-by-layer ("post holes → posts set → rails attached → panels in → caps on"), and presses play to watch an animated build sequence.
Five fence styles are covered today:
Cedar dog-ear privacy — 3 post types: wood 4×4 PT (U-channel bracket), PostMaster+ steel (hat-channel), 2-3/8″ round steel (Pipe Grip Tie + dome cap)
Vinyl Solid Privacy — 5×5 routed-slot vinyl post, crimped rails, T&G boards, flush 5-sided cap
Wood Board on Board — 3 post types, plus an optional Cap & Trim picture-frame layer that auto-renders for "w/ Cap & Trim" styles
Wood Horizontal Privacy — 2 post types: 4×4 PT with continuous u-channel + cedar face board; PostMaster+ direct-mount through factory-predrilled flange holes + cedar face board
Wood Shadow Box / Good Neighbor — 4×4 wood only; alternating front + back picket rows on opposite rail faces, 1.5″ depth between rows for the signature "shadow" effect
The 3D preview embeds inside every customer-shared quote where the line item maps to one of these styles. The customer doesn't need an account or a download — just opens the quote link on their phone or laptop, spins the model around, and signs once they're satisfied.
💡 Why both: The AI render closes "will this look good on my house?". The 3D Build Visualizer closes "am I getting what I paid for?". Pairing them in the same customer quote dramatically reduces post-install disputes — the customer has both visual confirmations on record before they signed.
19. Manual Drawing Mode (No Parcel Data)
Manual Mode lets you create estimates even when parcel data isn't available. You can draw fence lines freehand and optionally draw a custom property boundary polygon. This is essential for rural areas, new subdivisions, and properties where parcel data is missing or inaccurate.
When to Use Manual Mode
No parcel data found — Rural properties, newly developed areas, or parcels not in the GIS database
Interior fence runs — Dividing a property into sections (backyard privacy fence + front yard picket fence)
Custom shapes — Irregular or curved fence layouts that don't follow property lines
Entering Manual Mode
Manual Mode is offered automatically — there's no upfront "Manual Mode" button. Search an address or click a property, and when no parcel boundary is available the sidebar shows "📍 No parcel data here yet" with a "📐 Draw Manually" button. Click it to draw the job by hand.
When parcel data is available, Visual Fence Pro keeps you on the parcel-based workflow — it's faster and more accurate. Manual Mode is reserved for properties with no parcel coverage.
Drawing Freehand Fence Lines
In Manual Mode, you draw fence lines by clicking points on the map:
Click on the map where you want the first fence post
Click the second point — a cyan line connects them
Keep clicking to add more points. The fence line follows your clicks
Double-click or press Enter to finish the fence line
The fence segment appears in the sidebar as "Freehand Run 1"
Select a product and height, and the BOM calculates just like parcel-based estimates
Drawing a Property Boundary Polygon
If you want to define the property boundary for reference:
Click the "Draw Property Boundary" button (top of the sidebar in Manual Mode)
Click points around the perimeter of the property
Keep clicking until you've traced the full boundary
Click near the first point to close the polygon (you'll see a pulsing indicator when you're close enough to snap)
The boundary polygon appears as a cyan outlined shape
Visual Fence Pro automatically converts the polygon into selectable fence segments (one per side)
Each side appears in the sidebar as "Front", "Back", "Left", "Right", etc.
You can delete sides you don't want to fence, or adjust them by dragging posts
💡 Snap-to-Close: When drawing a property boundary, hover near the first point you placed. You'll see a pulsing circle — click to snap and close the polygon automatically.
Snap Features in Manual Mode
Manual Mode includes smart snap features to help you draw straight fences:
Right-angle snap — Lines auto-snap to 0°, 45°, and 90° angles within 5° tolerance. Hold Shift to disable
Snap-to-vertex — When placing a point near an existing endpoint (within 15 pixels), it auto-snaps to connect perfectly (prevents gaps)
Snap-to-close — When drawing a polygon, hovering near the first point shows a pulsing indicator to snap and close the shape
Live Measurement Display
While drawing, a floating label follows your cursor showing the distance from the last point. This helps you draw precise lengths without having to finish the line first.
Undo in Manual Mode
Made a mistake? Press Ctrl+Z (or Cmd+Z on Mac) to undo the last point you placed. You can undo multiple times to step backward through your drawing.
Saving Manual Mode Projects
Manual Mode projects save exactly like parcel-based projects:
After drawing fence lines and assigning products/heights, click "Save Project"
Fill in project name, customer info, and notes
Click "Save"
The project is saved with a _manualMode flag and reloads correctly when you open it later
Address Search in Manual Mode
You can still use address search in Manual Mode:
Enter an address in the search bar
The map flies to that location
The address is saved to the project (appears on quotes and work orders)
Manual Mode stays active — no parcel boundary is fetched
ℹ️ Manual Mode Stats: The sidebar shows live stats while drawing: total fence lines, total sides (if boundary drawn), and total footage. This helps you track progress on complex layouts.
19.5. Survey PDF Upload Mode
For pre-construction lots, raw land, or properties where satellite imagery isn't usable (heavy tree cover, new subdivisions before aerial photos are updated), upload a survey PDF and trace fence runs directly on it. The bill of materials, customer quote, gates, and payments all work the same as satellite mode — the only difference is what you're drawing on top of.
When to Use Survey Upload
Pre-construction job — the home isn't built yet, so the lot looks like dirt on satellite
Heavy tree cover — the satellite view shows trees instead of the actual property lines
Custom-home builders — the customer hands you a copy of their land survey before clearing the lot
HOA / permit documents — the only authoritative drawing of property lines is on a PDF
How It Works (Three Steps)
Upload the PDF. From the Property card, click 📄 Upload Survey. Choose any PDF up to 50 MB (vector or scanned, single or multi-page). The PDF replaces the satellite map in the workspace. A help modal walks you through the next two steps on first use.
Set the scale. Click 📐 Set Scale. Find a labeled distance on the survey — a lot-line bearing like N89°46'22"E 124.80' or anywhere the surveyor printed a measurement. Click the first endpoint, then the second endpoint. A modal asks for the real distance (feet, inches, yards, or meters). Type the labeled value and hit Set Scale. Calibration locks in for that page. Multi-page PDFs calibrate each page separately.
Trace the fence. Click ✏️ Draw Fence. Each click after the first finishes the current fence section AND starts the next — so 4 clicks gives you 3 independent sections. Double-click or press Enter to finish. Esc cancels. Each section appears in the sidebar with its own length, fence-type override, and gate button — and wood-fence sections also get a required Boards In / Boards Out toggle.
💡 Calibration accuracy: Use the longest labeled distance you can find on the survey. Calibrating against a 5-foot line and then drawing a 100-foot fence amplifies any pixel-pick error 20×. A 100+ ft lot-line bearing gives much tighter accuracy.
Boards In / Boards Out — Wood Sections
Wood fences have a finished side and a framed side, so each wood section needs its boards orientation set before you can generate a quote. Vinyl, chain-link, aluminum, and other styles look the same from both sides — they have no toggle. "Boards Out" means the smooth side faces the street (standard). "Boards In" means the smooth side faces the yard — typically for alleys, ditches, or when the customer wants the nicer side on their property. Quote actions are blocked until every wood section has the choice made, and the customer's signed quote shows the orientation per section so there's no miscommunication on install day.
Gates on Survey Lines
Same flow as satellite: click + Gate on a section in the sidebar, then click anywhere along the fence line on the PDF. The gate appears as a gap in the fence with two gold posts. Set swing direction (In / Out) and hinge side (L / R) in the sidebar — a blue swing arc renders on the PDF showing how the gate opens. The BOM engine deducts gate footage from the fence run exactly like satellite gates.
Multi-Page Surveys
Use the ◀ / ▶ page buttons in the toolbar to flip between sheets. Each page calibrates independently — the scale on Page 1 doesn't apply to Page 2. Fence sections drawn on a page only appear on that page; switching pages doesn't show segments from other pages. The customer's quote combines all pages into one total (because the developer / GC paying the bill wants one number, not multiple sheets to add up).
Save & Reopen
Saved survey projects re-fetch the PDF from secure storage when you reopen them. Calibration, traced fence lines, gates, and Boards In/Out choices all restore exactly as they were. The PDF stays private to your company — no public URLs.
20. Advanced Settings & Customization
The Settings page has advanced options for fine-tuning pricing, customizing materials, and managing your account. Most contractors can use the defaults, but power users can tweak everything.
Pricing & Markup
At the top of Settings → Pricing & Markup, the “How do you price your fences?” card sets your company-wide default pricing method for new fence styles — My advertised rate or My costs + markup (see Two Ways to Price Each Fence). It only sets the starting point for styles you create next; styles you’ve already set up keep their current method, and you can override the method per style on the Products page.
The markup and labor fields below apply only to styles priced as costs + markup — styles on your advertised rate ignore them:
Material Markup % — How much you mark up material costs. Example: $100 materials × 100% markup = $200 to customer. Set to 0 if your material prices are already at sell rate.
Labor Markup % — Percentage markup applied to labor costs. Set to 0 if labor is already at sell rate.
Gate Pricing
Gate pricing is set per product on the Products page. See Section 9: Adding Gates for full details. Each product has 3 simple gate price fields:
Walk Gate — One flat price for all walk gates (3-5ft wide, any height)
Double Drive 10ft — Price for 10ft double drive gates
Double Drive 12ft — Price for 12ft double drive gates
💡 Best Practice: Set gate prices on each product — wood gates cost very differently from iron gates. The per-product approach ensures accurate estimates automatically.
Fence Textures (Visualizer)
Customize fence textures for the AI Visualizer (coming soon). These settings will affect how the visualizer renders fences. They don't affect quotes or BOMs.
Account Settings
In Settings → Account:
Change Email — Update your login email address
Change Password — Update your login password (must be at least 6 characters)
Team Members & Seats
Invite team members to your company account. Each plan includes a set number of seats:
Free — 1 seat (owner only)
Starter — 2 seats
Pro — 5 seats
Enterprise — 15 seats
To invite a team member:
Go to Settings → Team
Click "Invite Team Member"
Enter their email address
They'll receive an invite email with a link to join your company
Your current seat usage is shown in the Team section (e.g., "2/5 seats used"). If you need more seats, upgrade your plan or contact support.
Danger Zone
At the bottom of Settings, the Danger Zone section contains actions that can't be undone:
Clear All Textures — Removes all custom fence textures
Clear Company Info — Resets your company name, phone, email, and address
Reset Everything — Removes all data including textures and company info. Use with extreme caution.
Founding Member Feedback
Have feedback, bug reports, or feature requests? Email sean@visualfencepro.com directly. Founding Members get priority for feature requests.
21. Plans, Billing & Cancellation
Visual Fence Pro has four plans. You can upgrade or downgrade anytime. Every upgrade starts with a 14-day free trial on the new tier — you only get charged if you decide to stay.
💡 Founder Pricing through August 31, 2026: Sign up to any paid plan before August 31 and lock in 70% off forever — Starter $23/mo, Pro $53/mo, Enterprise $89/mo. Discount auto-applies at checkout and stays for the life of your subscription.
Starter — $79/mo (currently $23/mo with Founder Pricing). 2 seats, unlimited estimates & quotes, branded quotes, embeddable Public Estimator Widget.
Pro — $179/mo (currently $53/mo with Founder Pricing). 5 seats, unlimited products, Work Orders, QuickBooks sync, Stripe Connect (online deposit & invoice payments), Google Calendar, full analytics.
Enterprise — $299/mo (currently $89/mo with Founder Pricing). 15 seats, everything in Pro plus white-label quotes and a white-label widget (no "Powered by VFP" badge).
Upgrading
Any upgrade to a higher tier starts with a 14-day free trial. You're not charged until the trial ends. You can upgrade straight from any tier to any higher tier — you don't have to step through each level.
Go to Settings → Billing & Subscription
Click the upgrade button for the plan you want
Enter your payment info at the secure Stripe checkout page
You're redirected back to your dashboard on your new plan — with 14 days to try it out
At the end of the trial, your card is charged the new plan's monthly rate automatically
💡 You won't be double-charged if you're mid-period. If you're on Pro and upgrading to Enterprise, your Pro subscription is paused (not cancelled) during the Enterprise trial. Pro resumes automatically if you cancel Enterprise before the trial ends.
Downgrading
Want to move to a lower paid tier (e.g., Pro → Starter) without cancelling? You can do that right from Settings, and it takes effect at the end of your current billing period — so you keep everything you've already paid for until then.
Go to Settings → Billing & Subscription
Under Change plan, click Downgrade next to the lower tier
Confirm. You keep your current plan and all its features until your billing period ends
At the end of the period, you automatically switch to the lower tier and start paying its rate
💡 No refund, no extra charge, and you can change your mind. Downgrades schedule for your billing period's end rather than charging or crediting you mid-cycle. Until it takes effect, a "Keep my [plan]" button lets you cancel the scheduled downgrade and stay where you are.
Cancelling
You can cancel any paid subscription from inside the app. Cancellation always steps you back to the plan you had before your current one:
If you cancel during a trial (you haven't been charged yet) — you immediately revert to your previous plan. No charge at all.
If you cancel after your trial ended and have been paying — you keep access at your current tier until the end of your billing period, then transition to the previous tier.
If you signed up directly to a paid plan (e.g., chose Pro at signup, never had Starter) — you revert to Free.
To cancel:
Go to Settings → Billing & Subscription
Click the Cancel subscription link (or Manage billing & invoices) — both open the secure Stripe Customer Portal
In the portal, click Cancel subscription to confirm
Your dashboard updates to reflect the new plan automatically
FAQ
Q: Do I get a refund if I downgrade or cancel?
No — we don't prorate refunds for unused time on a paid plan. But you keep access at your paid tier until your billing period ends, and any new trial-granted time on a lower tier carries over, so you never lose paid-for days.
Q: Will I lose my projects or customers if I drop back to Free?
No. All your data is preserved regardless of plan — projects, quotes, customers, products, everything. You only lose access to features not included in your new tier (e.g., Work Orders are Pro-only). If you re-upgrade later, everything is exactly where you left it.
Q: What happens if I try a higher plan and don't like it?
Cancel during the 14-day trial. You'll be reverted to your previous plan automatically — no charge for the trial, and your old plan picks up where it left off. For example: if you were on Starter, upgraded to Pro, and cancel Pro on day 10, you drop back to Starter and resume Starter's billing cycle from where it was paused.
Q: Can I keep trying the same plan over and over?
No. Trials are once per plan within a 14-day window. If you trial Starter, cancel, then try to re-upgrade to Starter within 14 days, the checkout page will show "$79 due today" instead of "14-day free trial." You can trial a different plan (e.g., Pro) without the cooldown.
Q: Can I switch between monthly and annual billing?
Today, all plans bill monthly. Annual billing is coming — email sean@visualfencepro.com if you want to lock in annual pricing early.
Q: My card got declined. What happens?
Stripe retries failed cards automatically for up to 2 weeks. You'll get an email from us and from Stripe. If retries fail, your account drops to Free and you can re-upgrade once you've updated your card in Settings → Billing.
Q: Where can I update my payment method?
Settings → Billing & Subscription → Manage billing & invoices (opens Stripe's secure portal). You can add cards, set a default, or remove old cards there.
💡 Need help with a billing issue? Email sean@visualfencepro.com directly. Billing support is usually resolved same-day.